Plumbing & Appliances
Garbage disposal troubleshooting: humming, silent, or leaking
A step-by-step decision tree for a garbage disposal that hums, stays silent, leaks or rattles, plus horsepower sizing and the knockout plug mistake.
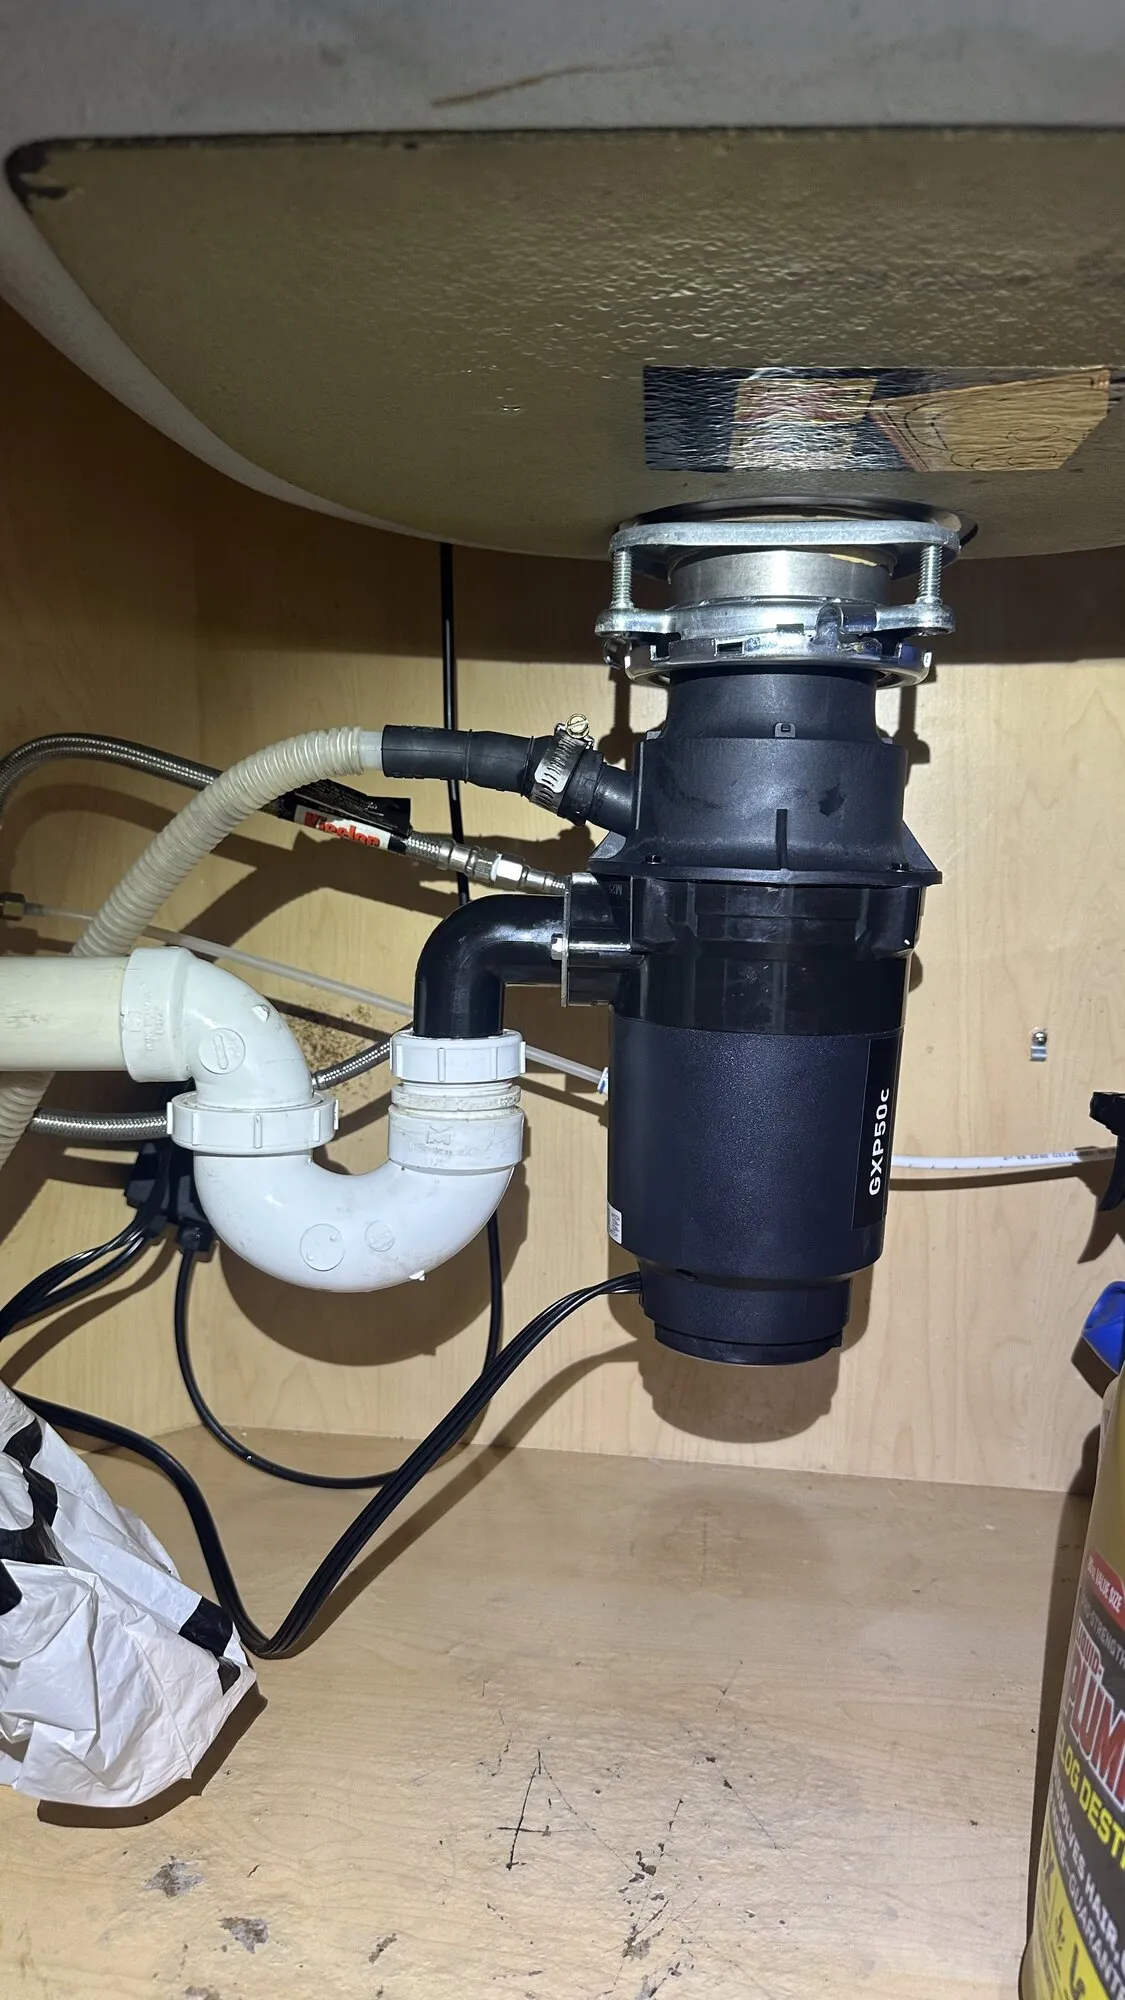
A garbage disposal gives you exactly four symptoms, and each one points somewhere different. It hums without turning, it makes no sound at all, it leaks, or it rattles. Work the symptom you actually have instead of poking at all four, and most of these get solved in under twenty minutes with a hex key.
One rule before anything else: never put your hand into the grinding chamber. Not with the switch off, not with the breaker off, not for one second. If something needs to come out, it comes out with tongs, needle-nose pliers or a magnet.
What is actually inside one
Worth thirty seconds, because it changes how you think about the failure modes. A disposal has no blades. There is a spinning plate with two or three blunt swiveling lugs called impellers, and a fixed grind ring around the outside of the chamber. The plate flings waste outward against that ring, and the ring shreds it into slurry that washes out through the discharge port.
Nothing is sharp. Nothing is meant to cut. That is why fibrous material defeats it, and why a jam is usually something wedged between the plate and the ring rather than something dulling an edge.
Tools and materials
- 1/4 in hex key, the offset one supplied with most disposals
- Needle-nose pliers and long tongs
- Flashlight or headlamp
- Bucket, towels, and a dry paper towel for leak hunting
- Adjustable wrench and channel-lock pliers
- Plumber’s putty, if you are re-seating the sink flange
- A lamp or phone charger to test the outlet with
- Screwdriver and hammer, if you are punching a dishwasher knockout
Symptom 1: It hums but will not turn
This is a jam, and it is the most common call I get.
- Turn the wall switch off right now. A stalled motor draws heavy current and cooks itself in seconds. Do not stand there holding the switch hoping it breaks loose.
- Switch the circuit off at the breaker, or unplug the unit if it is cord-and-plug connected to an outlet inside the cabinet.
- Look into the chamber with a flashlight from above. If you can see the culprit, get it out with tongs or pliers.
- Get under the sink and find the hex socket in the center of the underside of the unit. Insert the 1/4 in hex key.
- Work the key back and forth, both directions, using firm steady pressure. You will feel it break loose and then spin a full turn freely. Keep turning until it goes around cleanly in both directions.
- Look in the chamber again and remove whatever came loose.
- Press the red reset button on the underside. If it had tripped, it will click and stay in.
- Restore power, run cold water, and switch it on.
If it hums again immediately, something is still wedged. Go back to the hex key. If the plate spins freely by hand but the unit still hums under power, the start capacitor or the motor is failing and the unit needs replacing.
Some models have no hex socket. On those, you use a broom handle or a wooden spoon handle in the chamber from above, levering against an impeller to rotate the plate. Same rules apply: power off first, wood only, never a hand.
Symptom 2: Completely silent
No hum, no click, nothing. Work down the list in this order, because it goes cheapest to most expensive.
- Reset button. Underside, red, usually center. If it is popped out, push it in until it clicks. Wait five minutes first if the unit has been running hot, or it will just pop again.
- Breaker. Check the panel. A disposal is often on a shared small-appliance circuit, so if the kitchen counter outlets are also dead, you have found it. Reset the breaker fully off, then on.
- GFCI. If the disposal is fed from a receptacle that is GFCI protected, or downstream of one, find and reset it. In many kitchens that device is at the counter, not under the sink.
- The outlet. Most disposals plug into a receptacle inside the cabinet that the wall switch controls. Unplug the disposal, plug in a lamp or a phone charger, and flip the switch. If the lamp does not come on, the problem is the switch or the wiring, not the disposal.
- The switch. A worn switch is a common failure and a cheap part, but replacing it is electrical work inside a box. If you are not comfortable proving the circuit dead with a meter before you open it, hand this one off.
- The motor. If the outlet is live, the reset is in, and the unit is silent, the motor or its internal wiring has failed. Disposals are not economically repairable at that point. Replace it.
Symptom 3: It leaks
Three places leak, and the location tells you whether this is a repair or a replacement. Dry everything completely, put a sheet of dry paper towel underneath, run water, and watch where the wet spot starts.
| Leak location | What it looks like | Fix |
|---|---|---|
| Sink flange, at the top | Water appears at the rim, runs down the outside of the body | Repair: re-seat the flange with fresh plumber’s putty and retighten the mounting ring |
| Discharge tube or dishwasher inlet | Drip at the side where the drain pipe or hose connects | Repair: replace the rubber gasket, replace the flange bolts if corroded, snug evenly |
| Body seam or bottom | Weeping or rust streaks from the shell itself, often near the base | Replace the unit. A corroded shell cannot be sealed |
Sink flange leak
The top flange is bedded in plumber’s putty and clamped by the mounting assembly. Over years the putty dries and the mount loosens, usually helped along by somebody yanking on the disposal while cleaning under the sink. Drop the unit, pull the flange up, scrape all the old putty off both the sink and the flange, roll a fresh rope of putty, reset it and retighten the mounting ring evenly.
If your sink is granite or another porous stone, use silicone rather than putty, same as with a faucet base.
Discharge tube leak
The discharge tube bolts to the side of the disposal with a flange, two bolts and a rubber gasket. That gasket flattens and hardens. Replace it, check that the bolts are not rusted to nothing, and tighten them alternately so the flange pulls down square. Do not crank one side down first.
The dishwasher inlet nipple on the other side has its own hose clamp. A drip there usually just needs the clamp snugged, or the hose replaced if it has gone hard.
Body leak
If water is coming from the seam of the housing or weeping from the bottom, the inside of the shell has rusted through. There is no gasket, no sealant and no epoxy that fixes this properly. Replace the unit.
Symptom 4: Rattling and grinding noise
Almost always a foreign object: a coin, a bottle cap, a pop tab, a bone fragment, a small spoon. Power off, flashlight in, retrieve with pliers or tongs.
If the chamber is genuinely empty and it still rattles, look at the impellers. They are meant to swivel on their pins. A broken or missing impeller makes the plate unbalanced and noisy, and it is not a repairable part on a residential unit.
A rattle right after a new installation has one classic cause, covered below.
What actually kills a disposal
Very little of this is about horsepower. It is about what goes down the drain.
Fibrous material. Celery strings, artichoke leaves, corn husks, onion skins, banana peels. These do not shred, they wrap. They wind around the plate hub and the impeller pins and turn into a fibrous rope that binds everything. This is the number one cause of jams.
Starch. Potato peels, rice and pasta. Ground fine and mixed with water, starch makes a paste that packs the chamber and then sets up in the trap below.
Grease and fat. This is the one that does the real long-term damage, and the damage is downstream in the drain line rather than in the disposal itself.
Coffee grounds and eggshells. They grind fine but they settle and build sediment in the trap. Small amounts are fine. A whole French press basket every morning adds up.
Bones and fruit pits. Small soft bones from fish or chicken are fine on a larger unit. Beef bones, mango pits and avocado pits are not. They do not grind, they bounce around, and they chip the grind ring.
Why cold water and not hot
This one gets argued about, and the physics are simple. Fats and oils that go down the drain are either solid or liquid depending on temperature. Cold water keeps them solid, so the disposal chops them into small particles that the water flow carries out and away.
Hot water melts them. The liquid grease flows a few feet down the drain line, hits cooler pipe, cools, and hardens onto the pipe wall. Repeat that daily for two years and you have a restriction in a horizontal drain run that no plunger reaches. Under a South Florida slab, that drain line is not something you can just open up for a look.
So: cold water, run it before you switch on, and keep it running fifteen to twenty seconds after the grinding noise stops so the slurry actually clears the trap.
And do not pour chemical drain cleaner into a disposal. It sits in the chamber against metal and rubber components rather than moving through, and if the clog does not clear you have now filled a sink with caustic liquid that somebody has to reach into.
Choosing a replacement: horsepower and size
When a unit is genuinely dead, this is the table I work from.
| Motor | Typical fit | Practical notes |
|---|---|---|
| 1/3 hp | One or two people, light cooking, small kitchen | Smallest chamber and the least torque. Jams most readily. Cheapest to buy |
| 1/2 hp | Most households. The sensible default | Handles everyday scraps. Widest model selection at every price point |
| 3/4 hp | Busy family kitchen, frequent cooking | More torque means fewer jams. Usually better sound insulation. Larger body |
| 1 hp | Heavy daily use, large households | Biggest chamber and quietest models, but the heaviest and tallest. Check clearance first |
Two things matter more than the horsepower number when you are standing in the aisle:
Physical size. A 1 hp unit is noticeably taller and fatter than a 1/2 hp unit. Measure from the underside of the sink to the cabinet floor, and check that the discharge port will still line up with your existing trap arm. Going up two sizes often means re-plumbing the drain, which turns a one-hour swap into three.
Continuous feed versus batch feed. Continuous feed is the standard type with a wall switch and an open drain. Batch feed requires a stopper to be inserted and turned before it will run, which makes it essentially impossible to run with something in the chamber. If there are small kids in the house, batch feed is worth the extra money and the extra step.
Induction motors are generally quieter and hold torque better at low speed than the lighter permanent magnet motors used in budget units. If noise bothers you, that spec matters as much as the horsepower.
The dishwasher knockout plug
This deserves its own section because it is the single most common installation error, and it produces a symptom that sends people chasing the wrong appliance entirely.
Every new disposal ships with the dishwasher inlet sealed by a molded knockout plug, because not every kitchen has a dishwasher draining into the disposal. If you connect the dishwasher drain hose without removing that plug:
- The dishwasher will not drain.
- It will sit with standing water in the tub at the end of a cycle, or throw a drain fault code.
- You will spend a Saturday convinced the dishwasher pump has failed.
To do it correctly:
- Before mounting the unit, lay it on its side.
- Put a flat screwdriver into the dishwasher inlet against the plug and tap it once, firmly, with a hammer. It punches through as a disc.
- Turn the unit over and shake the disc out of the chamber, then confirm with a flashlight that it is gone. If you leave it in there, it circulates, rattles and eventually jams the plate.
- Then connect the dishwasher hose and clamp it.
If your kitchen has no dishwasher, leave the plug alone. That is what it is for.
While the hose is off, confirm the dishwasher drain still rises to a high loop fastened up under the countertop, or runs to an air gap on the sink deck. That loop keeps sink water from draining backward into the dishwasher.
Safety and when to stop
- Hands never enter the chamber. Tools only.
- Kill power at the breaker for anything beyond pressing the reset button, and unplug the unit if it is cord connected.
- If the cabinet floor is standing in water and there is a live receptacle in there, turn the circuit off before you reach in with a towel.
- If the disposal is hardwired rather than plugged in, and you are not confident proving the conductors dead with a meter, get help. Replacing a hardwired unit involves opening the connection cover on the bottom of the appliance.
- If the leak turns out to be coming from the drain line inside the wall or below the slab, that is a licensed plumber’s job, not a handyman repair.
- If the unit smells burnt or the body is hot to the touch after a short run, stop using it. That is a failing motor.
When it’s worth calling someone
A jam and a reset are genuinely a ten-minute homeowner fix, and you should try it before paying anyone. A dead motor, a corroded body, or a replacement that needs the drain re-plumbed to fit is a different job, especially lying on your back in a cabinet with the trap dripping on your face. I do garbage disposal replacement and repair across Broward, Palm Beach and north Miami-Dade, usually in a single visit with the new unit in the truck.
If you are already opening that cabinet, it is a sensible time to look at replacing the kitchen faucet and the supply lines while everything is out from under there. And if the drain problem turns out to be somewhere else entirely, faucet and sink installation work usually turns it up.
Questions people ask about this
Why does my garbage disposal hum but not turn?
A hum with no rotation means the motor has power but the grind plate is jammed. Turn the switch off immediately, because holding it on with the motor stalled overheats the windings and trips the thermal overload. Fit a 1/4 inch hex key into the socket in the center of the underside and work it back and forth until the plate spins freely, then press the red reset button before trying it again.
What does the red button on the bottom of a garbage disposal do?
It is the manual reset for the thermal overload protector, which cuts power when the motor overheats or stalls. If it has popped out, the unit will be completely silent until you push it back in. Clear whatever caused the overload first, give the motor a few minutes to cool, then press the button until it clicks and stays in.
Can a leaking garbage disposal be repaired?
It depends entirely on where it leaks. A leak at the sink flange on top is fixed by re-seating the flange with fresh plumber's putty, and a leak at the discharge tube is fixed by replacing the gasket and tightening the flange bolts. A leak from the bottom or the seam of the metal body means the internal shell has corroded through, and that unit is finished. There is no repair for a cracked or rusted-through housing.
Should I run hot or cold water with a garbage disposal?
Cold water, every time, and keep it running for fifteen to twenty seconds after the grinding noise stops. Cold water keeps fats and grease solid so they get chopped into particles and carried out with the flow. Hot water melts grease into a liquid that travels a few feet down the drain, cools, and hardens into a restriction you cannot reach.
What is the dishwasher knockout plug and why does it matter?
New disposals ship with a molded plug sealing the dishwasher inlet, because not every installation has a dishwasher connected. If you attach the dishwasher drain hose without punching that plug out first, the dishwasher cannot drain and will sit full of water or throw a drain error. This is the single most common garbage disposal installation mistake, and the plug also has to be fished out of the chamber after you knock it through, or it rattles around and jams the unit.
What size garbage disposal do I need?
For most households a 1/2 hp continuous feed unit is the sensible default and handles everyday kitchen scraps without complaint. A 1/3 hp unit is fine for one or two people who cook lightly, but it has a smaller chamber and jams more readily. Step up to 3/4 hp or 1 hp for a busy family kitchen, keeping in mind that the bigger units are physically larger and heavier and need real clearance under the sink.